Your password alone is no longer enough. If an attacker gets hold of your credentials—through a data breach, phishing, or a reused password—two-factor authentication (2FA) is the single biggest barrier standing between them and your account. Enable it on these five account types today.
Before You Enable 2FA: Two Things to Do First
Skipping this step is how people get locked out of their own accounts.
- Save your backup codes. Every major platform generates a set of one-time recovery codes during 2FA setup. Download them, print them, or store them in a password manager. If you lose your phone, these codes are your fallback.
- Add a recovery option. Make sure your account has an up-to-date recovery email address or phone number before you turn on 2FA. This gives you a second path back in if something goes wrong.
Which 2FA Method Is Actually Safest?
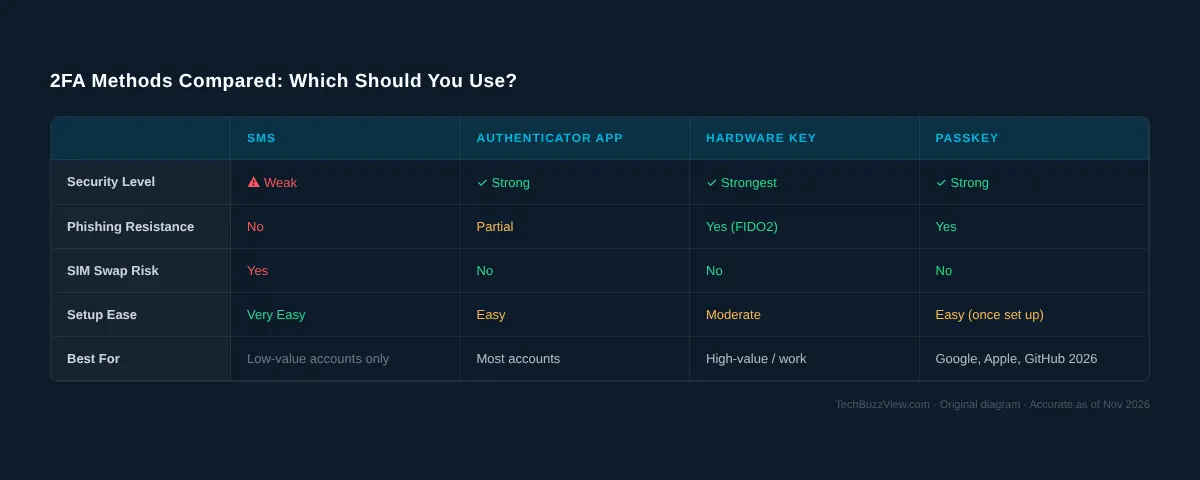
Not all second factors are equal. Here’s how the common options stack up, from weakest to strongest:
- SMS text message codes — Convenient, but the weakest option. SIM-swapping attacks let criminals port your phone number to a device they control, intercepting your codes. Avoid SMS 2FA for email, financial, and work accounts.
- Authenticator app (TOTP) — Generates a fresh 6-digit code every 30 seconds on your device, with no network connection needed. Apps like Google Authenticator, Microsoft Authenticator, and Authy are the right choice for most accounts. Far more resistant to phishing and SIM swapping than SMS.
- Hardware security key — A physical device (like a YubiKey) you plug in or tap via NFC. The strongest form of 2FA for high-value targets: executives, journalists, developers, and anyone whose compromise would be catastrophic. Keys are immune to phishing because they verify the domain before responding.
- Passkeys — The newest option, now supported by Google, Apple, Microsoft, GitHub, PayPal, Amazon, Coinbase, and dozens more in 2026. A passkey uses your device’s biometrics (Face ID, fingerprint) to authenticate you without a password at all. Where available, passkeys replace both the password and the second factor simultaneously—and they’re phishing-resistant by design.
Bottom line: Use an authenticator app for everyday accounts, a hardware key for the highest-value ones, and a passkey wherever the platform supports it.
Quick Reference: Where to Find 2FA Settings
| Account Type | Recommended Method | Where to Find the Setting |
|---|---|---|
| Google / Gmail | Authenticator app or passkey | myaccount.google.com → Security → 2-Step Verification |
| Apple ID | Trusted device (built-in) | iPhone: Settings → [your name] → Sign-In & Security |
| Microsoft / Outlook | Authenticator app | account.microsoft.com → Security → More security options |
| Instagram / X (Twitter) | Authenticator app | Settings → Security → Two-Factor Authentication |
| Bank / PayPal / financial | Authenticator app or hardware key | Account Settings → Security or Privacy |
How to Set Up 2FA on Your 5 Most Important Accounts
1. Google Account
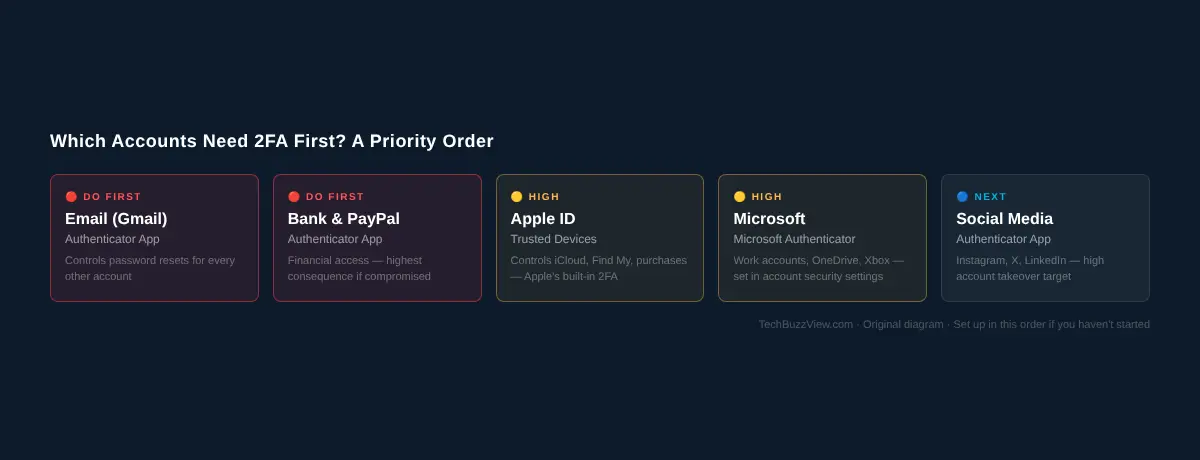
Google is the master key for most people—your Gmail, Drive, and any app you’ve signed into with “Sign in with Google.” Protecting it is the highest priority.
- Go to myaccount.google.com and sign in.
- Click Security in the left sidebar.
- Under “How you sign in to Google,” click 2-Step Verification.
- Click Get started and follow the prompts.
- Choose Authenticator app, then scan the QR code with Google Authenticator, Authy, or Microsoft Authenticator.
- Enter the 6-digit code the app shows to confirm setup.
- Download and save your backup codes when prompted.
Upgrade path: Once 2FA is set up, consider adding a passkey from the same Security page. Google’s passkey option lets you sign in with your fingerprint or face without typing a password.
2. Apple ID
Your Apple ID controls iCloud, App Store purchases, Find My, and backups of every device you own. Apple uses a trusted-device model: when you sign in on a new device, a 6-digit code pops up on your other Apple devices.
- On iPhone or iPad: go to Settings → [your name] → Sign-In & Security.
- Tap Turn On Two-Factor Authentication and follow the steps.
- On a Mac: open System Settings → [your name] → Sign-In & Security.
- Add a trusted phone number to receive codes as a fallback.
Apple’s system is tightly integrated with its hardware, so there’s no separate app to configure. The key action is making sure you have a trusted phone number on file as a recovery fallback.
3. Microsoft Account
Microsoft accounts cover Outlook email, OneDrive, Xbox, and Office 365. The Microsoft Authenticator app is the smoothest option here.
- Go to account.microsoft.com and sign in.
- Click Security in the top navigation.
- Click More security options.
- Under “Two-step verification,” click Set up two-step verification.
- Install Microsoft Authenticator on your phone, then scan the QR code shown on screen.
- Confirm with the code the app generates.
4. Instagram and X (Twitter)
Social accounts are prime phishing targets. Losing control of an Instagram or X account to a hacker—especially for creators and businesses—can be damaging and difficult to reverse.
Instagram: Tap your profile photo → Settings and privacy → Accounts Center → Password and security → Two-factor authentication → choose Authentication app.
X (Twitter): Click More → Settings and Support → Settings and privacy → Security and account access → Security → Two-factor authentication. Note: X restricts SMS 2FA to paid subscribers, which is actually a nudge toward the more secure authenticator app option.
5. Financial Accounts (Bank, PayPal, Venmo)
Financial accounts are where the real damage happens. The exact steps vary by institution, but the pattern is consistent:
- Log into your account and go to Settings or Profile.
- Look for a Security or Privacy section.
- Find Two-factor authentication or Two-step verification and enable it.
- Choose an authenticator app over SMS wherever the option exists.
Many US banks still only offer SMS 2FA. If that’s your only option, it’s still significantly better than no 2FA—enable it and push your bank to add authenticator app support.
Common 2FA Mistakes to Avoid
- Not saving backup codes. The most common way people get locked out. Treat backup codes like a physical key—store them somewhere safe and separate from your phone.
- Using SMS for high-value accounts. If you’re protecting an email account, a crypto wallet, or a business account, SMS is not good enough. Use an authenticator app or hardware key.
- Using the same authenticator app as your password manager on the same device with no PIN. If someone gets into your unlocked phone, they have both the password and the second factor. Add a PIN or biometric lock to your authenticator app.
- Not transferring 2FA when switching phones. Authenticator apps don’t transfer automatically like contacts do. Before you factory-reset or sell your old phone, export your accounts or use a cloud-backup option like Authy.
- Thinking 2FA makes you immune to phishing. Sophisticated real-time phishing attacks can still intercept TOTP codes. Passkeys and hardware keys are immune to this; app-based TOTP codes are not. Use passkeys where available.
The Right Tool for Managing It All
If you’re setting up 2FA across a dozen accounts, a password manager that also stores TOTP codes—like 1Password or Bitwarden—keeps everything in one place. Bitwarden is free and open source; 1Password costs $2.99/month and is built for families and teams. Either one handles passwords, backup codes, and authenticator codes together, so you’re not juggling multiple apps.
The setup takes about 20 minutes across all five account types. That’s the best 20 minutes you can spend on digital security this year.