

Cloudflare’s free plan puts a global CDN, Universal SSL, DDoS protection, and a basic Web Application Firewall in front of your WordPress site at no cost. This guide walks you through every step — from creating your account to verifying traffic passes through Cloudflare — including the settings most tutorials skip.
What Cloudflare Actually Does for Your WordPress Site
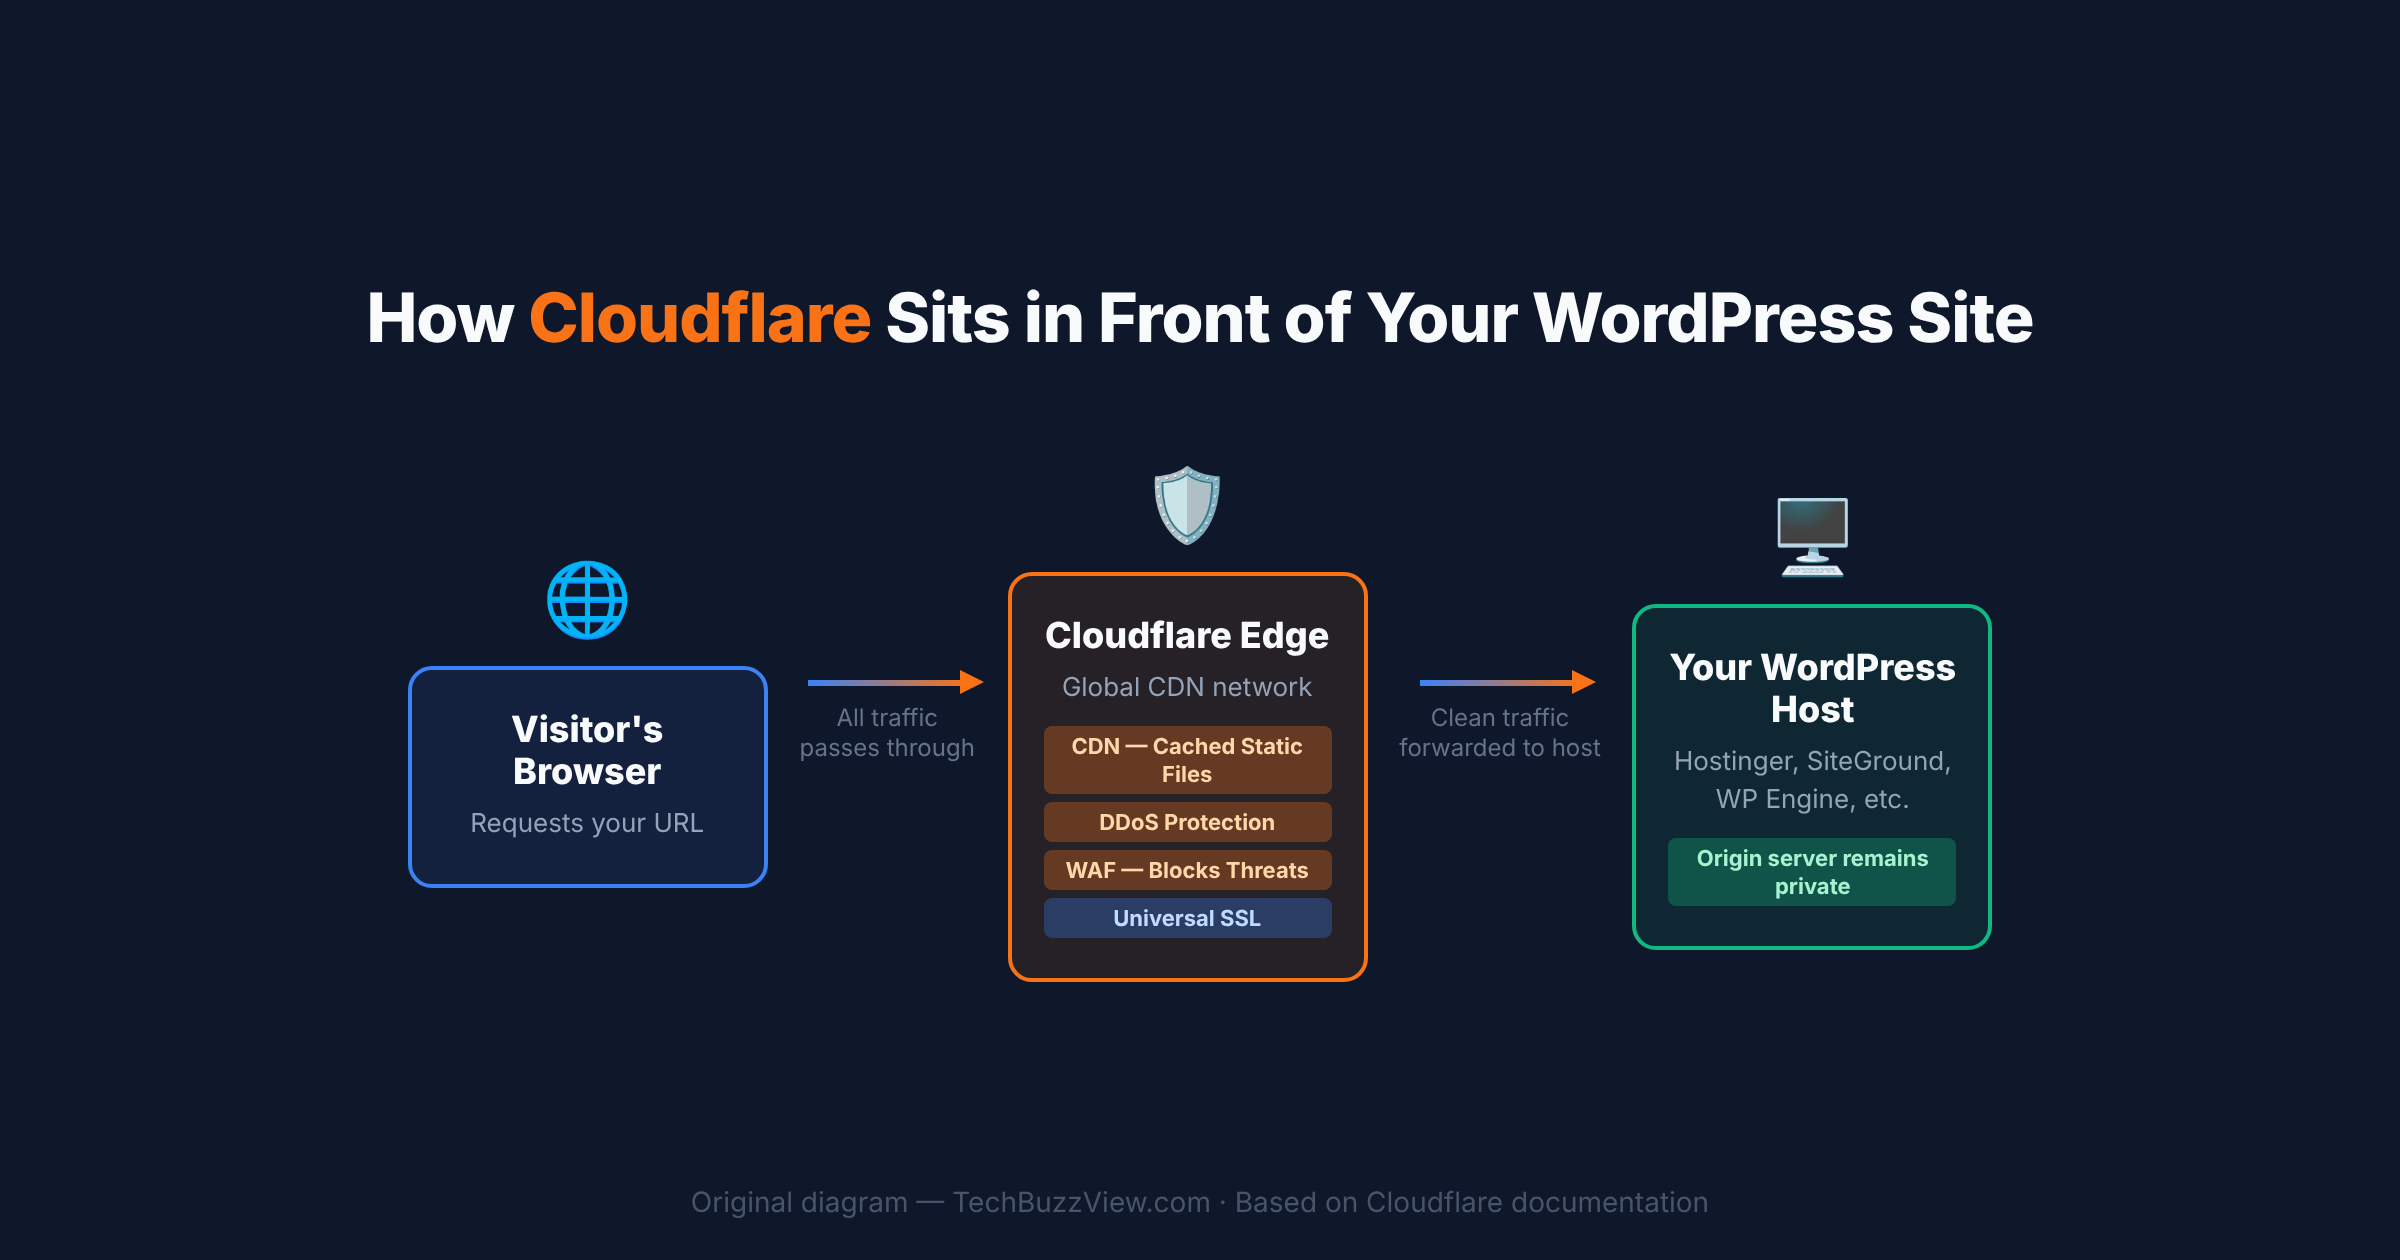
Cloudflare sits as a reverse proxy between your visitors and your WordPress host. Every HTTP request goes through Cloudflare’s global edge network first. This gives you four immediate benefits on the free plan:
- CDN for static files — images, CSS, and JavaScript are cached at Cloudflare’s edge servers worldwide, so visitors download assets from a server close to them rather than your hosting server’s location.
- Universal SSL — Cloudflare issues a free TLS certificate so your site works over HTTPS without paying for one separately.
- DDoS mitigation — Cloudflare absorbs volumetric attacks at the network level before traffic reaches your host.
- Basic WAF rules — managed rules block common threat patterns like SQL injection and cross-site scripting.
One thing the free plan does not do by default: cache your WordPress HTML pages. Dynamic pages — including your homepage, posts, and category pages — pass through Cloudflare uncached unless you add the Automatic Platform Optimization (APO) add-on ($5/month) or use a WordPress caching plugin separately. More on this later.
Prerequisites Before You Start
- Access to your domain registrar’s control panel (where you manage nameservers — this is NOT the same as your hosting dashboard in most cases)
- Your WordPress hosting account has a valid SSL certificate installed (required for Full Strict SSL — the safest option)
- Admin access to your WordPress dashboard
- 15–30 minutes for the setup; up to 24 hours for DNS propagation afterward
Step-by-Step: Setting Up Cloudflare on WordPress
Step 1: Create a Free Cloudflare Account
Go to cloudflare.com and sign up for a free account. Verify your email address. No credit card is required for the free plan.
Step 2: Add Your Domain
In your Cloudflare dashboard, click Add a domain. Enter your root domain only — for example, example.com without https:// or any path. Select the Free plan and continue.
Cloudflare scans your existing DNS records automatically and imports them. This scan is usually accurate but verify it in the next step.
Step 3: Review Your DNS Records
This step is where most setups go wrong if rushed. Cloudflare shows you all your imported DNS records. You need to:
- Confirm the root domain’s A record (or CNAME) points to your hosting server’s IP address
- Confirm the
wwwrecord is present and points to the same destination - Set web traffic records (A, AAAA, CNAME for your domain and www) to Proxied — the orange cloud icon
- Set mail records (MX, SPF, DKIM, DMARC) to DNS Only — the gray cloud icon. If mail records are set to Proxied, your email will break
- Add any missing records before proceeding
If DNSSEC is currently enabled at your registrar, remove the existing DS record there before changing nameservers — Cloudflare’s setup instructions cover this.
Step 4: Change Nameservers at Your Registrar
Cloudflare assigns you two unique nameservers — for example, emma.ns.cloudflare.com and rick.ns.cloudflare.com (yours will differ). Go to your domain registrar’s dashboard (not your host’s dashboard — these are often different companies) and replace the existing nameservers with the two Cloudflare assigns you.
After saving, return to Cloudflare and click Check nameservers now. DNS propagation typically takes a few minutes to a few hours; it can take up to 24 hours in some cases. Your domain status changes to Active when complete. Do not modify your DNS records while waiting.
Step 5: Configure SSL/TLS — Use Full (Strict)
In your Cloudflare dashboard, go to SSL/TLS → Overview. Set the encryption mode to Full (strict). This is the most secure option: Cloudflare validates your origin server’s SSL certificate on every request.
Avoid Flexible mode. Flexible mode sends traffic from Cloudflare to your origin over plain HTTP even when visitors see HTTPS — and it commonly causes redirect loops on WordPress sites. If your host has a valid SSL certificate (most modern hosts do), Full (strict) works without issues. If it throws errors, fix the origin certificate rather than downgrading the SSL mode.
After confirming the edge certificate is active (shown in SSL/TLS → Edge Certificates), enable Always Use HTTPS to automatically redirect any HTTP requests to HTTPS.
Step 6: Install the Cloudflare WordPress Plugin (Optional but Recommended)
The official Cloudflare plugin for WordPress lets you manage some Cloudflare settings directly from your WordPress dashboard and handles cache purging when you publish or update content.
- In WordPress, go to Plugins → Add New, search for Cloudflare, install and activate the official plugin.
- In Cloudflare, go to My Profile → API Tokens → Create Token. Use the WordPress template, complete the summary, and copy the token immediately — it will not be shown again.
- In the WordPress plugin settings, choose Sign in with existing account, enter your Cloudflare email and the token, then save.
If you have another caching plugin active (WP Rocket, LiteSpeed Cache, W3 Total Cache), test compatibility before enabling both. Some combinations cause conflicts; most work without issue on current versions.
Step 7: Verify Your Setup Works
Open your site in a browser. Open Developer Tools (F12 on Chrome/Firefox), go to the Network tab, and reload the page. Click on the main HTML document request and look for Response Headers. You should see a cf-ray header — for example, cf-ray: 8abc1234def01234-EWR. That header confirms traffic is passing through Cloudflare.
You may also see cf-cache-status: MISS or cf-cache-status: DYNAMIC for your HTML pages. That is expected behavior on the free plan — it means Cloudflare forwarded the request to your origin rather than serving it from cache. Only static assets (images, CSS, JS) will show HIT on the free plan.
Recommended Settings at a Glance

| Setting | Recommendation | Why |
|---|---|---|
| SSL/TLS mode | Full (strict) | Most secure; avoids redirect loops |
| Always Use HTTPS | Enabled (after SSL works) | Forces HTTPS sitewide |
| DNS proxy for web records | Proxied (orange cloud) | Enables CDN, WAF, DDoS protection |
| DNS proxy for mail records | DNS Only (gray cloud) | Keeps email routing intact |
| Rocket Loader | Off initially | Can break JavaScript on some themes |
| Development Mode | On only while troubleshooting | Bypasses cache; auto-disables after 3 hours |
| WAF managed rules | Enabled (default) | Blocks common attack patterns |
| Caching / Page Rules | Keep defaults at first | Add rules only for specific needs; 3 rules free |
Setup Explainer: How Cloudflare Protects Your Site
What the Free Plan Does Not Do
Understanding these limits prevents surprises after setup:
- HTML page caching: Dynamic WordPress pages are not cached at Cloudflare’s edge. Your server still generates each page on request. To cache HTML at Cloudflare, you need the Automatic Platform Optimization (APO) add-on ($5/month) or a full-page caching plugin on your server (WP Rocket, LiteSpeed Cache, etc.).
- Page Rules: The free plan gives you 3 Page Rules. These are useful for specific cache overrides or redirects, but 3 goes fast if you try to build complex rules. The Pro plan ($20/month) gives 20.
- Image optimization (Polish/Mirage): These features that resize and convert images to WebP on-the-fly require the Pro plan.
- Advanced Bot Management: The free WAF blocks known bad bots, but sophisticated bot management tools are paid add-ons.
Common Mistakes to Avoid
Using Flexible SSL Mode
Flexible sends traffic from Cloudflare to your origin over HTTP. If your WordPress site also has HTTPS redirect rules, this creates an infinite redirect loop. Always use Full or Full (strict) if your host has an SSL certificate installed.
Setting Mail Records to Proxied
MX, SPF, DKIM, and DMARC records must be DNS Only (gray cloud). Proxying mail records routes them through Cloudflare’s HTTP proxy, which breaks email delivery. Double-check these after the initial DNS import.
Creating a “Cache Everything” Page Rule
Applying a Cache Everything rule to example.com/* without exclusions will cache your logged-in user pages, WooCommerce cart pages, checkout, and WordPress admin. Use targeted rules or rely on your server-side caching plugin instead.
Leaving Rocket Loader On During Debugging
Rocket Loader defers JavaScript execution to improve load times. It works well on many sites but breaks scripts that depend on synchronous loading order. If you notice JavaScript errors after enabling Cloudflare, disable Rocket Loader first.
Frequently Asked Questions
Does the Cloudflare free plan replace a WordPress caching plugin?
No — not for most WordPress sites. Cloudflare’s free plan caches static assets (images, CSS, JS) at the edge, but your HTML pages still load from your origin server on each request. A WordPress caching plugin (WP Rocket, LiteSpeed Cache, W3 Total Cache) generates static HTML files or serves cached responses directly from your server, reducing PHP and database load. Use both together: a caching plugin reduces your server load, and Cloudflare accelerates static asset delivery globally.
Will changing nameservers to Cloudflare affect my email?
Not if you set your mail records correctly. When Cloudflare imports your DNS, review every MX record, SPF record, DKIM record, and DMARC record and confirm they are set to DNS Only (gray cloud). Mail records set to Proxied will break email delivery. If email stops working after the switch, check these records first.
How long does DNS propagation take after changing nameservers?
DNS propagation typically completes within a few minutes to a few hours for most visitors. Full global propagation can take up to 24 hours in rare cases, depending on your previous TTL settings and your visitors’ ISP cache behavior. During propagation, some visitors may still reach the old nameservers. Your site stays online throughout; the change is a gradual transition, not a cutover.
Once Cloudflare marks your domain as Active and you see the cf-ray header in browser DevTools, your setup is complete. Cloudflare is now caching static assets, terminating SSL at the edge, and absorbing DDoS traffic before it reaches your WordPress host.